With the ascendency of Pinterest and Houzz, we are often approached by clients who have seen a photo of something they love and want to recreate in the home we are building for them. Because of our deep knowledge of the marketplace, we are usually able to source the item from a photo, or get the look by working with our local trade partners.
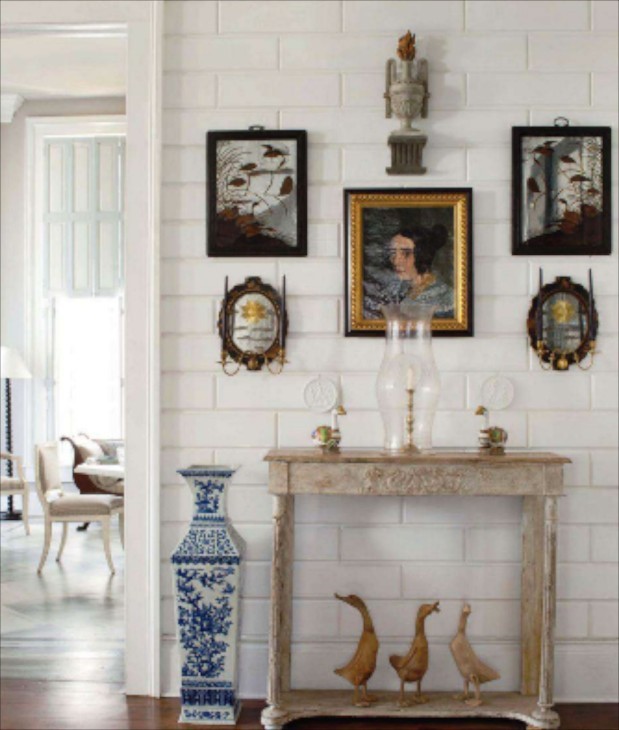
One of our greatest challenges came when a client presented us with a book, One Man’s Folly, by Julia Reed. The subtitle explains the book succinctly: The Exceptional Houses of Furlow Gatewood. Furlow Gatewood is primarily known for being a partner in the prestigious New York City antiques store that is part of John Rosselli International, a go-to source for high-end designers. When Gatewood retired to his childhood home in Americus, Georgia, he restored his family’s carriage house, imbuing it with a sense of style that is uniquely his own – weathered, elegant, comfortable, abundant, curated, wistful, classical, charming and creative as demonstrated in this photo from an article in Veranda magazine.
The Peacock House as shown in One Man’s Folly and Veranda magazine
Our reaction to the challenge of bringing such a complicated aesthetic to our client’s home was one of both excitement and caution, because, as a builder, it’s tricky to take what you see in a picture, find out how your client wants to tweak that vision, and translate it to your vendors and craftsmen who are going to make the vision a reality. But, the team at Canalfront Builders loves those kinds of challenges.
Case in point is the beveled pieces of wood on the walls of the Cuthbert House, which had been cut and laid out to mimic stone. Originally installed on the front porch of Furlow Gatewood’s house, he had brought the look inside and used it floor-to-ceiling in the foyer and neoclassical entry.
Wall Cladding in the Cuthbert House
Instead of taking the wall-cladding to the ceiling, our client wanted to end it at chair rail height. The photo raised the following questions: what size are the beveled pieces, and what did they mill it from? Also, what type of cap would we use at the chair rail height? Our project manager tried to contact the builder to learn more to no avail. We realized that if we took pine tongue and groove planking (this material will frequently have beadboard on one side and v-groove boards on the other side) and had the vertical v-grooves added, it would go up quickly and easily. The pine material would take paint well and would show some rustic knots that our client wanted to see for character.
After much discussion in the office, we concluded that the individual “blocks” or “tiles” were approximately 7” x 18”. However, our millwork vendor only offered v-groove boards that were 5-5/16” wide on the face. Coincidentally, we had recently asked for some whitewash samples and the boards the finisher used for the whitewash samples were wider, so then the challenge became finding those boards. We were ultimately able to source them and had some samples milled by a custom millwork shop in Baltimore. The sample was sent to us for approval with the final “tile” size being 6” x 14”.
Sample of tongue & groove beveled wall tile from our millwork shop
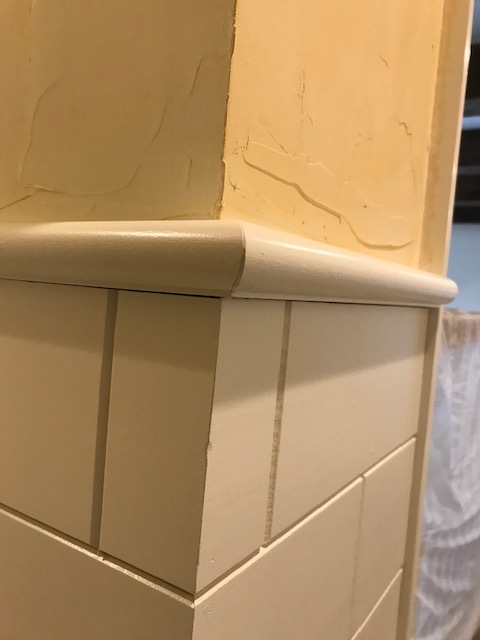
The next step was to find a suitable cap for the chair rail. Our client wanted something he described as “beefy” and another one of our Trade Partners suggested a 1-3/8” x 1-3/4” moulding.
Cap for Beveled Wall Tile
To get this whole assembly installed, our trim carpenter started with a 1x8 board on the starter course to pack out for the baseboard. The tongue & groove beveled boards went up pretty quickly, stacking them one at a time on the 1x8 and offsetting the vertical v-grooves. Wherever two boards butted up together, the carpenter had to bevel the ends in the field with a router. The beefy cap went on after 5 rows of boards and then the 8-1/4” baseboard was nailed over the 1x8 backer at the bottom to finish the look. The client also decided to skip-trowel and custom stain the drywall above the wainscoting in the following photo. The final detail happened during electrical rough-in when we had our electrician put all the electrical receptacles horizontally in the baseboard to keep the wainscoting clean and uncluttered.
Beveled Wall Tile in Foyer
This has been a great example of how Canalfront Builders can bring your vision to reality and how our trade partners work as part of our team to make your vision happen. Our client is delighted with the result, although we are still waiting for the floors to be installed for a fully finished look. We are getting so much positive feedback from people walking through the house, that we thought we’d share it here. We hope you get inspired!
Closeup of Wainscot Cap & Skip Troweled Walls


